Anatomy of a React ApplicationTable of contents
Introduction
Table of contents
I’m a big fan of React and have been learning it over the past few months. I’m in no way an expert, but am really loving the programming style and the power that I can get from a few lines of code. This article isn’t meant to be a tutorial on React, but rather an anatomy of a simple application I’ve written to practice both React and CSS.

The Application
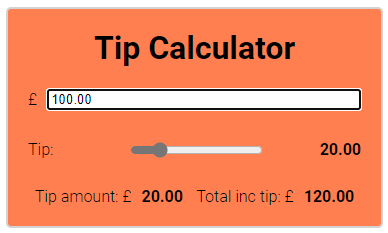
Ok, be prepared. This isn’t the most complex application ever written. Its a Tip Calculator. You’ve probably seen many of these, as have I. So why write this? Well, firstly, its not a ToDo list - hand’s up who’s written one of those before! It does however show how to use state and effects in react. It shows how to use props and how to invoke methods on the parent component from within child components.
The full source code for this application can be downloaded from GitHub
My Development Environment
Before we start to look at the application and the code, what tools did I use to write this application?
- VS Code (with the ES7 React/Redux/GraphQL extension)
- React 17.0.2
- Yarn
- create-react-app
One of my aims in writing this application was to not use any classes within the React codebase, and to use functional components throughout in combination with React Hooks. If you’re not familiar with React Hooks, I’d recommend checking them out as they pretty much mean you don’t have to write classes any more !
The Application
When I originally wrote the application, I wrote it all within one big functional component. The entire JSX for the application was in one file. Even though this is a small application, it got messy and complicated when trying to make changes, so I broke it down into different React components.
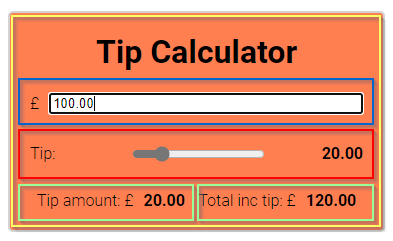
Within this diagram, you can see that I broke the application down into 4 different components.
- The application frame
- The bill total input
- The tip amount slider
- Tip Details. This component is used twice to display the tip amount and the total including tip.
The main entry point for the application is the TipCalculator.js file. This file is responsible for displaying the user interface of the application and managing the application’s state. As I wanted to use React Hooks, I’ve used the useState() method to store the application’s state.
const [billAmount, setBillAmount] = useState(0.0);
const [tipPercent, setTipPercent] = useState(20);
const [tipAmount, setTipAmount] = useState(0.0);
const [total, setTotal] = useState(0.0);
You can see that this is different from when storing state in a traditional class based approach as I have 4 different pieces of state (the bill amount, the tip percent, the tip amount and the total bill) rather than one state object. I really like this way of managing state. It’s simple and you don’t need to do any of the complicated stuff you need to with the class based approach.
When storing state in this way, one gotcha is that the calls to save the state (setBillAmount, for example) are asynchronous. So, you can’t change the state using setBillAmount and the expect the variable billAmount to be immediately updated. This caused me a bit of confusion at first, but the answer is to use the useEffect hook.
The useEffect hook and be configured to fire when state in the application changes. For this application, whenever the bill amount, tip percentage or tip amount change, then I need to recalculate the total cost. The useEffect hook is perfect for this.
useEffect(calculateBill, [billAmount, tipAmount, tipPercent]);
Basically, this hook says whenever any of the pieces of state within the array change, then invoke the calculateBill function. The calculateBill function is a straight forward arrow function to do a bit of maths.
const calculateBill = () => {
  let ta = (tipPercent * billAmount) / 100.0;
  setTipAmount(ta.toFixed(2));
  setTotal((ta + parseFloat(billAmount)).toFixed(2));
};
That’s pretty much it for the application logic. All that’s remaining is to handle changes to the bill amount and the tip percentage. To handle changes in these, I declare an arrow function to set the relevant state whenever these values change (we’ll hook these up to onchange events later).
const handleBillAmountChange = (e) => {
  const ba = parseFloat(e.target.value);
  setBillAmount(ba.toFixed(2));
};

const handleChangeTipPercent = (e) => {
  const tip = parseFloat(e.target.value);
  setTipPercent(tip.toFixed(2));
};
Finally, the jsx for the application needs to be rendered
return (
<div className="app">
  <div className="container">
    <h1 className="header-component">Tip Calculator</h1>
    <div>
      <form>
        <BillAmountInput handleChange="{handleBillAmountChange}" />
        <TipPercentageSlider
          tipPercent="{tipPercent}"
          handleChange="{handleChangeTipPercent}"
        />

        <div className="results-container">
          <TipDisplay title="Tip amount" value="{tipAmount}" />
          <TipDisplay title="Total inc tip" value="{total}" />
        </div>
      </form>
    </div>
  </div>
</div>
);
There are a couple of interesting things to look at in this code.
Firstly, you can see that subcomponents <BillAmountInput />, <TipPercentageSlider /> and <TipDisplay /> are used to display the majority of the application’s user interface.
BillAmountInput component
This component has a single property handleChange which is bound to the handleBillAmountChange method. This technique allows us to pass a function into a child component so that the child component can call this function when something changes.
Within the <BillAmountImput /> component, I’ve set the onChange handler for an input to invoke props.handleChange. This is set to handleBillAmountChange. The result of this is that whenever the input changes within the child component, the handleBillAmountChange method is called in the parent component. Neat !
export default function BillAmountInput(props) {
  return (
    <div className="input-container">
      <span className="currency" />
      <input
        className="tip-input"
        name="totalCost"
        placeholder="Bill amount"
        onChange={props.handleChange}
      />
    </div>
  );
}
TipPercentageSlider component
Next, we have the <TipPercentageSlider /> component. This works in exactly the same way as the previous component to let a handler on the parent component be called whenever the slider changes. In addition, there is another props called tipPercent which is used to display the tip percentage on the screen.
export default function TipPercentageSlider(props) {
  return (
    <div className="tip-container">
      <div className="tip-container-label">Tip:</div>
      <div className="tip-container-slider">
        <input
          type="range"
          min="1"
          max="100"
          value={props.tipPercent}
          onChange={props.handleChange}
          className="slider"
        />
      </div>
      <div className="tip-container-value">{props.tipPercent}</div>
    </div>
  );
}
TipDisplay component
Finally, we have the <TipDisplay /> component. This component simply has 2 props, namely, title and value which are used for rendering data to the screen.
function TipDisplay(props) {
  return (
    <div>
      {props.title}: <span className="currency" />
      <span className="tip-value">{!isNaN(props.value) && props.value}</span>
    </div>
  );
}

export default TipDisplay;
Conclusion
As you can see, this is a fairly simple application, but there’s a lot going on.
Firstly, there are multiple React components - each of which is written as a function. No classes have been used anywhere.
Application state has been managed by hooks and is all stored within the application, rather than in sub components.
The useEffect hook has been used to handle changes to state, which in turn cause the user interface to update.
Simple one way props have been used to display data on the screen. Props have also been used to pass in references to functions so that the parent component is aware of any changes in state.
If you’re learning React, or any other subject for that matter, I’d recommend practicing as much as possible. It may seem like a trivial application, but there are some really good concepts here that are worth learning.
Happy Reacting !
Credits
Photo by Ferenc Almasi on Unsplash