Sending Email From AWS Lambda Using Simple Email Service (SES)Table of contents
Table of contents
Sending emails from Amazon Simple Email Service via AWS Lambda is a fairly straightforward task, but there are a couple of gotcha’s along the way.
This article aims to show what is required to configure AWS SES and Lambda to be able to send emails.
Configuring SES
Before being able to send emails from SES, you need to verify your email address that you are going to be sending from. You can either verify an entire domain, or verify a single email address. In this article, we’re going to verify a single email address.
From the SES console, click Email Addresses from the menu to be shown the email verification page. Click the Verify a New Email Address button
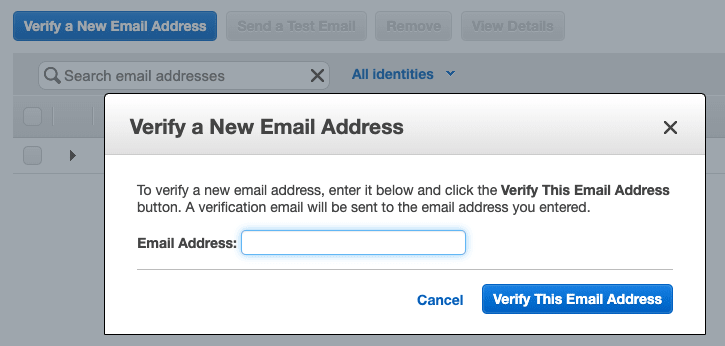
Enter the email address that you want to send emails from and click the Verify This Email Address button. AWS will then send a email to the specified address to validate that it is reachable and that you own it. The email will contain a link with in it. Click on this link to verify the email address.
SES is now configured to allow you to send from (and to send to) this address.
Note, that when you first use SES, your account is in a sandbox in which you can only send to email addresses that you have verified.
If you wish to send emails to email addresses that you have not validated, you must Request A Sending Limit Increase.
That’s all that needs to be done to configure SES. Next, we need to write a Lambda function that can send an email.
Writing a Lambda to Send Email Using SES
The simplest way of writing a Lambda function, is to log onto the Lambda Console and create a new function. Although, this initially looks the most straightforward way, its easy to forget that we need to specify an IAM Role for executing the Lambda that has access to SES. Also, making changes to Lambda functions via the console can become tricky and error prone when your functions start to get larger. For this reason, I prefer to use Claudia.js as this automates a lot of the manual steps for you. If you’ve not got Claudia.js installed, it can be installed via npm:
npm install claudia -g
After creating an empty project with npm init, we can define a Lambda function to call SES and define the policies required for Lambda to access SES.
Within a sample NodeJS project, a Lambda handler would look like below:
let aws = require('aws-sdk');
let ses = new aws.SES({
    region: 'us-east-1'
});
let myEmailAddress="<my registered email address>"

exports.handler = async (event) => {
    let emailParams = {
        Destination: {
            ToAddresses: [myEmailAddress]
        },
        Message: {
            Body: {
                Text: {
                    Data: "Hello, World !"
                }
            },
            Subject: {
                Data: "Sent from AWS Lambda"
            }
        },
        Source: myEmailAddress
    };

    try {
        let email = await ses.sendEmail(emailParams).promise();
    } catch (err) {
        console.log(err);
        return err;
    }

    return "ok";
}
There are several aspects to this code to note.
- We need to
requiretheaws-sdkso that we can create aSESinstance to send an email. - The
emailParamsvariable allows the source and destination email addresses to be specified, along with the body of the email. - In this example, the source and destination email addresses are the same (as I’ve only verified one email address within SES). Normally, you would expect these to be different email addresses!
- The
SES.sendEmail(...)method is used to send the email.
As you can see, the code to send an email follows a standard pattern of creating an email instance, setting up the parameters and then sending the email.
Remember earlier, we said that we needed to specify an email policy to allow Lambda to access SES. There are multiple ways of doing this, but using Claudia.js, we create a directory within the project called policies and within it add a file called send-email.json
The send-email.json policy document looks like:
{
  "Version": "2012-10-17",
  "Statement": [
    {
      "Effect": "Allow",
      "Action": [
        "ses:SendEmail"
      ],
      "Resource": [
        "*"
      ]
    }
  ]
}
Using Claudia.js To Deploy And Test
The Lambda function and the IAM policy are all the code we need to write to be able to deploy and test sending emails.
Using Claudia.js, we first need to create a deployment. We do this from the command line by executing:
claudia create --version dev --region us-east-1  \
  --handler lambda.handler --policies policies
The interesting points to note here are that the handler is set to lambda.handler meaning, the exported function handler inside the file lambda.js will be invoked. Additionally, the --policies policies argument tells Claudia.js to load the policy documents from within the policies directory.
Upon executing this command, Claudia.js will package up the application, create the relevant IAM roles and deploy the Lambda package to the specified region.
The application can then be tested from the command line using claudia-test-lambda command
$ claudia test-lambda
{
  "StatusCode": 200,
  "ExecutedVersion": "$LATEST",
  "Payload": "\"ok\""
}
If all goes well, you should receive an email from yourself :)
Conclusion
In this article, we’ve seen how to verify email addresses with Amazon SES, and then how to write a Lambda function to invoke SES and send emails. Finally, we saw how to use Claudia.js to automate and make the deployment repeatable.